Pages

Tuesday, October 4, 2016

Fast way to Upload DVD to Vimeo

This article will tell you how to upload DVD to Vimeo by ripping DVD to Vimeo friendly video formats.

"I have a dvd of a short film I made and need to upload dvd to vimeo on my mac. Any suggestions on how to do this? Thanks for your time."

"I am going to be recording on a DVD recorder and later uploading to vimeo. Does anyone know of any programs out there which allow you to copy DVD movie to Vimeo?"

Officially, Vimeo only supports video formats like MP4, WMV, AVI, FLV, MOV, etc. That is to say DVD is not currently supported. The only thing to upload DVD to Vimeo is to rip DVD to Vimeo friendly format with the help of a DVD to Vimeo converter program.

Here Brorsoft DVD Ripper is highly recommended to you. This DVD ripping tool can rip almost all encrypted DVD and convert DVD to MP4, MOV, AVI, MKV, etc popular formats for uploading and editing. For Mac user, Brorsoft DVD Ripper for Mac is your first choice.  Now download the software on computer and follow the guide below to start conversion.

How to Copy and Upload DVD to Vimeo

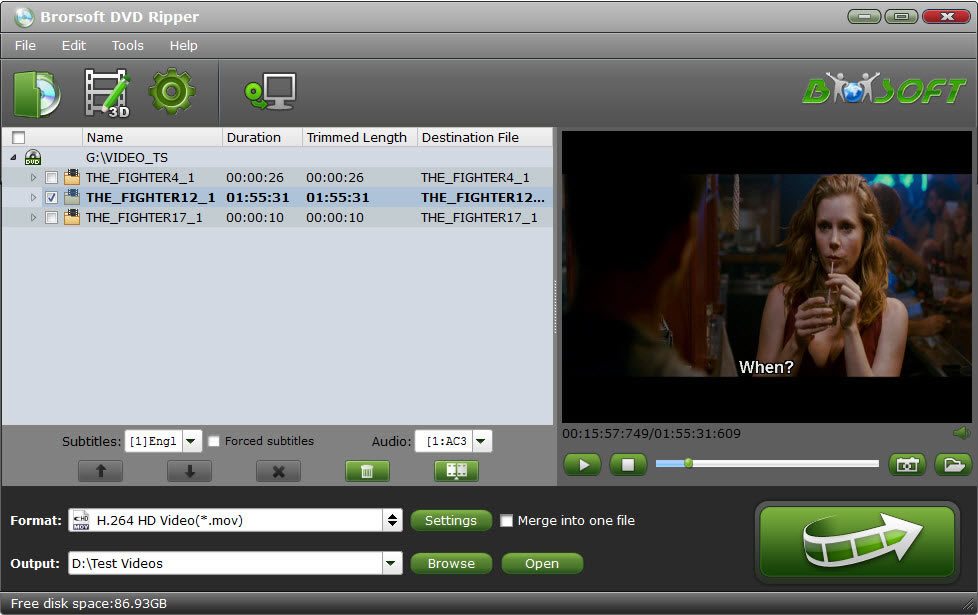
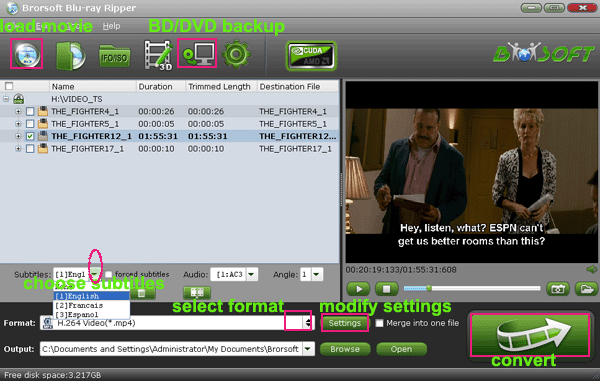
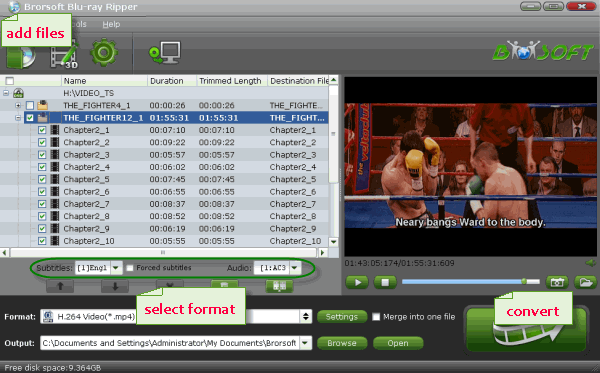
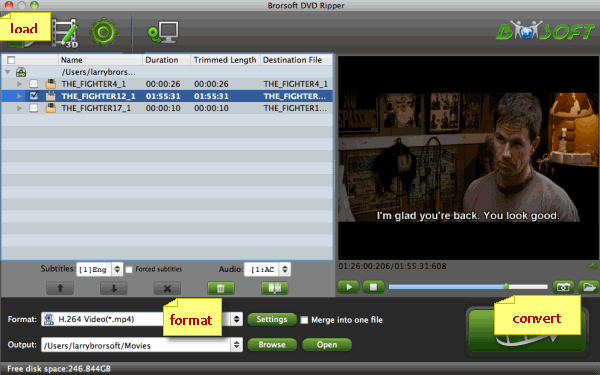
One: Insert the DVD disc into your computer's DVD drive and run DVD Ripper. You can click the "Load Disc" button to import the DVD files to the program. DVD ISO/IFO, VIDEO_TS folder are supported also.


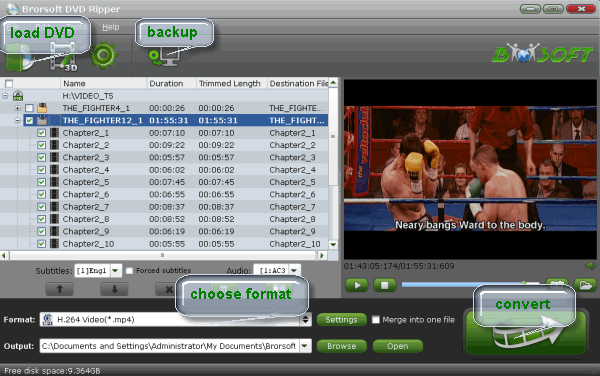
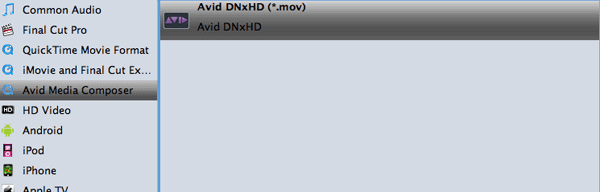
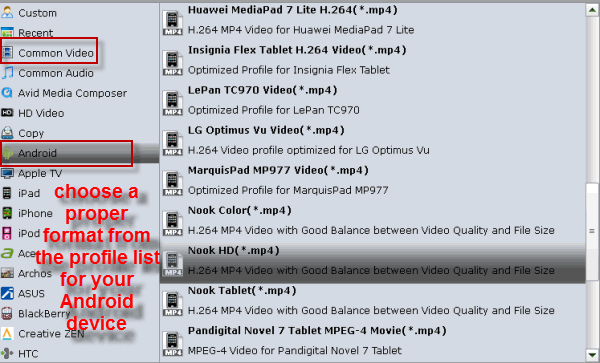
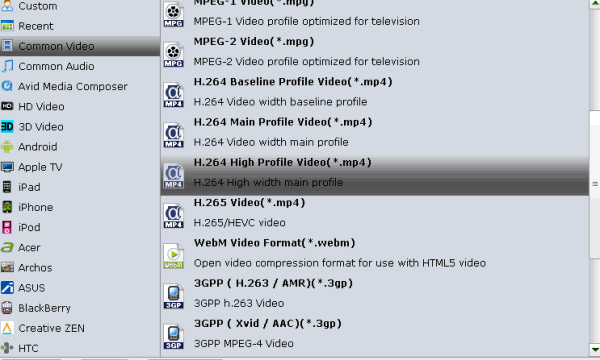
Two: Vimeo supports MP4, etc video files. So you can just select "Common Video" > "H.264 Video(*.mp4)" as the output video format.


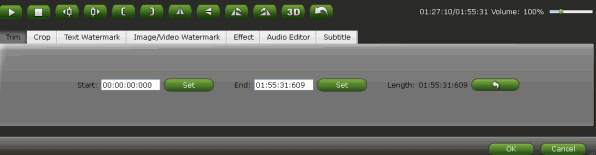
Three: Since Vimeo has limitations about the uploading video size and length, you can go to "Settings" page to trim the video file to get the very part you want.


Four: After all settings, you can click the "Convert" button to begin the DVD to Vimeo conversion. When the conversion is done, it is easy for you to find the generated file under "Open" panel. Now it's time to go to Vimeo.com to upload the video.

How to Upload videos into Vimeo

To upload videos on Vimeo, you must first be a member of the website. There are two membership options to choose from, paid and free. Logging in through Facebook is also possible. Once you’ve successfully set up your account, you should be ready to upload. Here’s how:

Step 1. Log into the account, go to the My Videos Tab and upload videos from there. Or look for where it says Upload in order to add videos directly. Click on "Choose a Video to Upload" button and browse through the video file on your hard drive.

Step 2. Wait for the file to be completely transferred into Vimeo's server. Check the status bar on your screen. Once it is done, you can check on the My Videos tab again to see if the video you just added shows up there. That indicates that the upload was successful.

Read More:

Friday, September 30, 2016

How to Edit DVD movies in DaVinci Resolve

Looking for ways to import DVD movies to DaVinci Resolve? This article will tell you how to edit DVD movies in DaVinci Resolve without any issue.

"I learnt that DaVinci Resolve can support video codec like QuickTime, Prores, DNxHD, MXF, DPX, CIN, EXR .etc. Does that mean I can not edit DVD movies in DaVinci Resolve directly? How can I do the editing work?"

In fact, the issue can be solved esaily. What we need to do is to find a professional DVD Ripping tool to encode DVD movies into DaVinci Resolve friendly format like DNxHD MOV .etc. To get the work done, I chose Brorsoft DVD Ripper, a perfect combination of video converter, player and editor for Windows.

With it, you can rip and convert DVD to DaVinci Resolve compatible video with original quality. The program can also transcode DVD files incluing Video_TS folder, ISO/IFO image files for editing in Windows Movie Maker, Avid Media Composer, Adobe Premiere Pro, Sony Vegas, etc NLEs. If you are a Mac user, pls simply turn to Brorsoft DVD Ripper for Mac.

Guide: Ripping DVD movies to DNxHD for DaVinci Resolve

A: First, insert your DVDs into DVD Drive, and then click "Disc" icon to draw into DVD movies you want to rip.


B: Click format column to Choose Avid Media Composer->Avid DNxHD(*.mov) as output format for DaVinci Resolve 11/12.


Tip: Before conversion, you can go to "Settings" page to adjust video size, bit rate, frame rate, sample rate and audio channels.

C: Tap the Convert button to start converting your DVD movies to Davinci Resolve DNxHD MOV files. When the conversion completes, locate the results videos ready to imported into Resolve.

Read More:

Friday, September 23, 2016

How to Convert TiVo files for DVD burning

Follow this article, you will know the details about how to transcode TiVo files to DVD format so that you can burn the TiVo to DVD disc for storing.


"Hello, do you know how to save TIVO files on DVD. Do I need to covert TiVo to MPG for buring into DVD disc? I used Nero burner currently."

As far as I know, most DVD burner software doesn't support .TiVo file directly, what we need to do first is to convert TiVo to a friendly format that is recognizable by DVD burner software. Therefore, here comes Brorsoft Video Converter for Mac. It can help you encode TiVo files into any video format you want for editing, playing and burning.

If you are a PC user, pls turn to Brorsoft Video Converter Windows version. Now, download the software on computer and follow the guide below to start conversion.

Transcode TiVo files for DVD burning

One: Launch the TiVo HD Video Converter and press "Option" button. Switch to "TiVo" tab in Option window, and enter TiVo Media Access Key.


Two: For Nero burning, pls choose AVI format from the Video format list. If you prefer high definition video, you can choose HD AVI from the HD video format list. If you have other burners, pls check the format your burner support first and then select a suitable one.


Three: Tap Convert button to start TiVo to AVI conversion. The conversion process will take a while, and you’ll see an encoding progress bar.

Once finished, click the Open button in the main interface and you can locate the encoded TiVo files effortlessly. And then you are able to use these files as you want for your DVD programs. Enjoy.

Monday, September 19, 2016

How to Play Blu-ray movies on Android Tablet/Phone

In this tutorial, you will learn how to rip and convert Blu-ray to Android tablet/phone supported file formats so that you can watch Blu-ray movies on your Android gadget with ease.


Wanna transfer Blu-ray discs on Android gadgets like Samsung Galaxy Tab 4/3/2, Google Nexus 7/10, Amazon Kindle Fire HDX, Galaxy S5/S4, Asus Transformer Pad TF701T, etc? Although Android devices don't have the BD drive for playing Blu-ray movies, in this article, you will learn how to put Blu-ray discs on Android Tablet/Phone.

Since Android tablet can not support Blu-ray discs directly, we'd better find a professional tool to rip Blu-ray movies into Android supported format like MP4 in advance. Brorsoft Blu-ray Ripper is a good choice for ripping Blu-ray movies to Android phones or tablets compatible video files with fast ripping speed and excellent output video quality. Plus, it has the optimal presets for Xoom, Transformer Prime, Kindle Fire HD, Nook (HD/HD+) Tablet, Toshiba Thrive, Google Nexus 7, Galaxy Tab, Samsung Galaxy S III, HTC One X, etc.

If you are a Mac user, please turn to the equivalent Mac version entitled Brorsoft Blu-ray Ripper for Mac.

How to Rip Blu-ray movies for playing on Android

One: Place the disc from the BD drive, launch the Blu-ray Ripper for Android. and then click "disc" button to import Blu-ray movies into the program. DVD discs, ISO and IFO files are also supported.


Two: Usually, MP4 is supported by almost all Android phones and tablets. Here you can choose "H.264 Video (*.mp4)" from "Common Video" as the output format. Also, this Blu ray converter provides optimized formats for Samsung, Motorola, Acer, Asus, Sony, Toshiba, HTC, etc branded Android devices; choose a proper one as you need. Or depends on your device, you can choose a suitable video format from "Android" catalogue.


Tip: Before Conversion, you can go to "Settings" page to adjust parameters including video resolution, bit rate, etc.

Three: Tap the Convert button to satrt Blu-ray movies to Android tablet/Phone conversion. When the conversion finished, you can click "Open" to locate the ripped files and easily transfer them to your Android device. Now, enjoy the movie on the go.

Read More:


Friday, September 16, 2016

Watch 3D Blu-ray movie on HTC Vive VR

This tutorial simply discusses how to rip and convert 3D Blu-ray to 3D SBS MP4 videos so that you can enjoy 3D Blu-ray movies on HTC Vive VR without the limitations.

"I've been wondering if there is now some out-of-the-box solution for watching 3D Blurays on the Vive?  Is there anyone here who watches 3D Blurays? If so, which ripping software and which player do you use?"

The 3d effect of HTC Vive VR is perfect so many users are looking players to make HTC Vive VR to afford 3D Blu-ray movies. However, as far as I know, HTC Vive VR can not directly support 3D Blu-ray discs. If you wanna enjoy 3D Blu-ray movie on HTC Vive VR freely, you'd better find a 3D Blu-ray ripping tool to help you first. I will share you my experience about how to rip 3D Blu-ray movie for HTC Vive VR.

First download Brorsoft Blu-ray Ripper.

It fully supports Blu-ray discs. With it you can easily convert 2D/3D Blu-ray movies or DVDs, ISO folders to MKV, MP4, WMV with 3D effect for theater entertainment on HTC Vive VR instead of going to cinema. If you're using a Mac, simply turn to Brorsoft Blu-ray Ripper for Mac. Now download the right version and follow the tips below to finish your task.

How to Rip 3D Blu-ray Movies for HTC Vive VR

A: Insert your 3D Blu-ray disc into your BD driver, run the 3D Blu-ray ripping software and click "BD/DVD disc" icon to load your movies.


B: Go to the Format bar and follow the path "3D Video > MP4 Side-by-Side 3D Video (*.mp4)" for ripping Blu-ray to side-by-side 3D MP4 video.


Tip: If you like, you can go to "Settings" page to adjust the parameters including video size, bitrate, frame rate and 3D depth.


C: Finally click the Convert button under the preview window to begin converting 3D Blu-ray to SBS 3D MP4 format you select.

The encoding process will be finished soon. After conversion, you can find the converted 3D Blu-ray files under "Open" panel. Now just enjoy 3D Blu-ray movies on your  HTC Vive VR.

Read More:


Tuesday, September 13, 2016

Best DVD Ripper for Mac for Mac Sierra

Looking for a best DVD Ripper for Mac Sierra? In this article, you will get the superb DVD Ripper for Mac Sierra. Keep reading.

This fall, Apple will release macOS Sierra, a major update to the Mac operating system. After upgrading the Mac OS X, some users may find that a lot of software are incompatible with new Mac system including the DVD Ripper for Mac like MacTheRipper and more. In this article, we will offer you a best DVD Ripper for Mac Sierra so that you can rip and copy the DVD movies without any issue.

The best Sierra DVD Ripping software should have the features of the full compatibility with Sierra OS, capacity to decrypt any DVD, the output format range, program stability, ripping speed, output quality, user customization, and user friendly level. In fact, there are huge amount of Mac DVD Ripper on the market now. What I choose is Brorsoft DVD Ripper for Mac.

With the latest technology, this DVD ripping software is fully compatible with Mac's latest OS Sierra and can rip DVD movies on Sierra effectively. It has a user-friendly interface and powerful DVD ripping capacity to rip commercial DVD to MP4, MOV, FLV, AVI, MPG, MP3, WAV, WMA, etc video, audio format types. Moreover, this Mac Sierra DVD ripper enables you to backup your DVD files to hard drive with the "Full Disc Copy" and "Main Movie Copy" options. Download the software and let's start ripping process.

Tutorial: How to Copy/Rip DVD on Mac OS Sierra


1. After running this app, click disc button to import the DVD files you want to convert.

2. Click the "Format" bar, you can choose MP4, MOV, MKV, FLV, WMV, AVI, etc. as the output format. Besides, some optimal presets for Final Cut Pro, iMovie, Adobe Premiere Pro, Avid Studio, etc. are also provided.

3. Finally click on the Convert button to rip your DVD to the preferred output format without least quality loss.

When the conversion finished, click Open button to get the resulted files easily. You can rip and play your DVD collection on OS X Sierra freely.

Friday, September 9, 2016

Freely Convert DVD ISO files to H.264 MP4/MOV/MKV

This article discusses how to convert DVD ISO files to H.264 MP4/MOV/MKV so that users can freely play DVD ISO movies.


A lot of users are looking for ways to change DVD ISO images into H.264 videos like MP4, MKV, MOV for easily playing. Today we are going to offer you the best way to convert DVD ISO to H.264 codec.

As a matter of fact, a lot of programs online can help users convert DVD ISO image files to H.264 MP4/MKV/MOV. Here we recommend you a best DVD ISO ripping too-Brorsoft DVD ISO Converter for Mac, which can effortlessly convert DVD ISO files to H.264 MP4/MKV/MOV, etc. In addition, it supplies some optimized video formats for portable devices like iPhone, iPad, Samsung Tab, Surface RT and more.

If you are a PC user, pls turn to Brorsoft DVD ISO Windows version. Now, download the software on Mac (Sierra included) and follow the guide below to start conversion.

How to Rip DVD ISO files to H.264 MP4/MOV/MKV

Step One: Download and Run the DVD ISO converter on Mac and import the ISO image into the program. DVD disc and DVD folder are also supported.


Step Two: In "Format" > "Common Video" column, you can select H.264 MP4, MOV, MKV as the output format. Or you can directly choose device outputs like Andriod, iPad, iPhone and more.


Tip: Before conversion, you can set the parameters including Video Size, audio&video codec, audio&video bitrate, frame rate in "Settings" page.

Step Three: After all the settings is completed, hit on the right-bottom "Convert" button to start converting DVD ISO file to H.264 video.

When the conversion is completed, you will have no problems to play and share DVD ISO file to H.264 videoon mobile devices, game consoles, media players, TVs and popular video sharing sites.

Read More: