Pages

Tuesday, May 31, 2016

Rip and Convert Blu-ray ISO to H.265 MP4/MKV on Mac

For storing Blu-ray image files movies in small file size while remain the same video quality, this article will teach you how to rip and convert Blu-ray ISO to H.265 MP4/MKV on Mac.

 Why we need to change ISO to H.265 codec instead of H.264

H.265 (also known as HEVC, short for High Efficiency Video Coding) is a video compression standard whose predecessor is H.264/MPEG-4 AVC. H.265 HEVC ensures to deliver video quality identical to H.264 AVC at only half the bit rate. The idea of HEVC is to offer the same level of picture quality as AVC, but with better compression, so there’s less data to deal with.

How to Encode Blu-ray ISO to H.265 MP4/MKV on Mac

Brorsoft Blu-ray Ripper for Mac with the H.265 decoder/encoder updated is rated as the best all-in-one Blu-ray to H.265 converter. With it, you can convert Blu-ray ISO/IFO, Blu-ray discs to H.265 MP4/MKV in smaller size as possible and keep the almost same quality. Besides H.265, it provides more regular video formats like MKV, AVI, WMV, MOV, FLV, WMV, etc. If you are a PC user, pls turn to Brorsoft Blu-ray Ripper Windows version. Now, download the software and follow the guide to learn how to.

How to Change Blu-ray ISO to H.265 MP4/MKV on Mac

Step 1. Choose "Load ISO/IFO" button to import Blu-ray ISO files. This program also supports Blu-ray discs and Blu-ray folders.


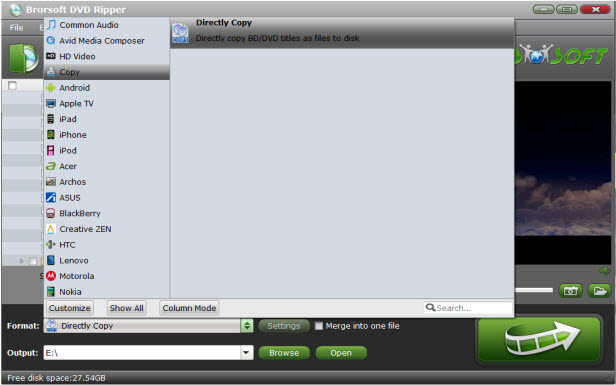
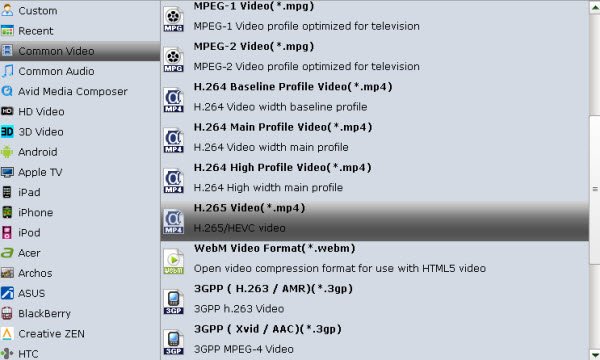
Step 2: Click on Format bar, select "Common Video" from the format list and in submenu you can find "H.265 Video(*.mp4)". The hit on the small folder icon to specify an output folder. In "HD Video" column, you can choose "MKV HD Video (*.mkv) as output and change its codec to "H.265" in Profile settings.


Step 3:  Tap "Convert" button and the program will rip Blu-ray movies to H.265 video immediately. You can easily find the output files in the output folders once the conversion is done.

Read More:

How to Digitize Blu-ray Collection on Mac
Copy Entire DVD Movie with DVD Extras on Mac
Freely Convert Blu-ray to QuickTime MOV on Mac
Simply Convert DVD ISO to AVI for playback
Losslessly Rip Blu-ray to MKV on Mac

The Best MakeMKV Alternative to Rip Blu-ray/DVD

MakeMKV fails to rip and copy Blu-rays on Mac (OS X 10.11 El Capitan) ? This article is about how to rip Blu-ray/DVD on Mac with the best alternative to MakeMKV.

 
MakeMKV should be the first choice for users to rip Blu-ray/DVD. However, with the update of the Mac system operating system, some feedback unveiled that MakeMKV for Mac would crack on Mac OS X El Capitan. In addition, when you want to rip Blu-ray/DVD to MP4, AVI, MOV, etc, MakeMKV for Mac can’t meet your need. That’s why so many people are searching for the Best MakeMKV Alternative. In this article, we will introduce you a powerful program to deal with Blu-ray/DVD movies.

The highly recommended MakeMKV Alternative is Brorsoft Blu-ray Ripper for Mac.  It helps you guys backup and rip Blu-ray/DVD to MKV losslessly, including any other popular video formats like MP4, AVI, MOV, WMV, FLV, M4V, etc. It also provides hundreds of preset outputs for you to directly convert and play BD/DVD on iPad, iPhone, iPod, Apple TV, Samsung Galaxy Tab, Kindle Fire HD, etc. In a word, it's a good alternative to MakeMKV and even works better. For those who are running in Windows (Windows 8 included), please get Brorsoft Blu-ray Ripper.

How to Use Mavericks MakeMKV Alternative to Rip Blu-ray/DVD
One: Run the software, click disc button to load Blu-ray, DVD content for converting. This program also supports DVD folder, ISO/IFO files.


Two: Click Format bar and go to the output format list of the MakeMKV alternative for Mavericks. All popular video & audio formats, even devices are contained here. It not only allows you to convert Blu-ray/DVD to MKV in high quality, but also convert to any other format like MP4, MOV, M4V, AVI, WMV, MP3, etc.


Read More:


Friday, May 27, 2016

Guide on Copying Main Movie only from DVD

This article will show you how to copy main movie only of a DVD with Brorsoft DVD Ripper software.


"Advertisement on DVD movie is much annoying. Is there any way that I can remove the Advertisement and watch the main movie only from DVD?"

Sometimes, you may want to watch DVD movies on PC without advertisement in the beginning. In this page, we will give you the solution to directly copying main movie from a DVD disc without extras to take up space.

By using Directly Copy of Brorsoft DVD Ripper, you can copy and backup your source DVD to a disc or onto your computer with only the main movie part. It’s convenient and easy to operate. Next let’s have a look at this detailed tutorial.

Download Brorsoft DVD Ripper (Mac version) on computer.

Useful tips: Besides backing up DVD movies on your hard drive, you can also use it to rip and convert DVD movies to any format you want or any tablet, smartphone or HD media players with optimized video formats.

How to Copy DVD Main Movie only

Step One: Insert DVD disc in driver and launch the DVD Ripper and click "Disc" button to load original DVD discs.


Step Two: Click "Format" bar, choose "Copy" > "Directly Copy" from the Format menu to copy the . vob files only which contains the main movie on your DVD disc.


Step Three: Finally, click "Convert" button to start lossless DVD Backup for Main Movie. When the copying work is done, you are able to click "Open" button to get the output .vob files without any other extra contents.

Read More:

Tuesday, May 24, 2016

Freely Upload Blu-ray/DVD movie to iCloud Drive

This article shows you how to share and upload DVD/Blu-ray to iCloud Drive on Mac by ripping DVD/Blu-ray to iCloud compatible video format.


What is iCould Driver

iCloud Drive is one of several ways to store, sync, and update data between your Apple (and even Windows) devices. Apple has now updated its cloud storage system to make it more visible and accessible to users and third-party developers.


"Now that I have some Blu-rays, I want to share the movies with my iPad or other iDevices. I was told that I can go to copy Blu-rays to iCloud first for sharing with iPad, iPhone, Apple TV. How can I achieve the goal?"

It is awesome to add Blu-ray movies to iCloud for Mac users and then share them between iDevices freely through iCloud. But the problem is how to rip Blu-ray movies to iCloud? Don’t worry, perfect solution for Blu-ray/DVD to iCloud format conversion is provided right here. This guide shows you the best way to rip and convert Blu-ray/DVD to iCloud supported video formats so that you can share and play on iPad/iPhone/iPod/Apple TV with ease.

First Dwonload Brorsoft Blu-ray Ripper for Mac. With its help, you can effortlessly get around the kinds of Blu-ray/DVD copy protections and convert them to iCloud Drive compatible video formats MOV, MP4 as well as other popular formats, like AVI, MKV, M3U8, H.265, WMV, MPG, FLV, SWF, M4V, etc. Besides iCloud Drive, you're also allowed to convert your Blu-ray/DVD collections to store or share on Google Drive, DropBox, OneDrive or other cloud storage. If you are a PC user, pls turn to Brorsoft Blu-ray Ripper windows version. Now, download the software and follow the guide below to start ripping.

How to Backup Blu-ray/DVD movie to iCloud Drive

Step One: Install and launch the best Blu-ray converter, then click "disc" button to import the DVD/Blu-ray movies that you want to import to iCloud Drive.


Step Two: Click "Format" to select an output format. You can either choose MP4, MOV as the output format or select the icon of a iDevice like iPad to get videos with optimized settings.


Tip: "Settings" page will let you make adjustments of output video parameters including Video&Audio codec,  Video&Audio bitrate, Frame rate .etc.

After all necessary settings, click the "Convert" button to begin converting Blu-ray/DVD movies to iCloud highly compatible video files. After the conversion, click on "Open" button to access to the videos you ripped. Afterwards, just copy the converted file to your iCloud for sharing anywhere you want.

Read More:

Freely Convert Blu-ray to QuickTime MOV on Mac

Friday, May 20, 2016

Best way to Import DVD disc to FCP for editing

Want to edit DVD movies in Final Cut Pro (FCP X)? Simply follow this article to convert and import DVD to FCP on Mac OS X (El Capitan).

 
"I inserted a DVD to FCP. I click on import and click files then choose a file and there is the DVD icon in the finder. Click on the DVD and there are 2 folders Audio_TS and Video_TS. I succesfully downloaded the Video files to FCP there is audio on this DVD. Now what?"

DVD video does not natively work within FCP (FCP X). They must be ripped off the disc and then converted. This process works to rip DVD video for use in any editing application, but in this example we’ll optimize for Final Cut Pro.  Follow these simple steps.

First download Brorsoft DVD Ripper for Mac. With it, you can effortlessly rip DVD to ProRes for further editing within your Final Cut Pro X on Mac without quality loss. What's more, this Mac DVD ripper allows you to fast convert DVD to Apple Intermediate Codec(AIC) for iMovie, MOV for iTunes, DNxHD for Avid MC and more to satisfy your different needs. Now, let's start ripping.

How to Transcode DVD disc to Apple ProRes for FCP

Step 1. Load your DVD movies > Insert the DVD disc into your DVD drive and drag the disc icon from the desktop to the program to load the DVD files. Alternatively, you can click File > Load from disc to locate and add the DVD movies you want to convert.


Step 2. Select output format > Clicking "Format" bar and choose Apple ProRes 422 (*.mov) as output format from the "Final Cut Pro" category. The output videos will work with FCP flawlessly.


Step 3. Start DVD to FCP ProRes conversion > Tap the Convert button to start converting DVD to Final Cut Pro supported video format. A few minutes later, you'll get the converted videos. Now launch Final Cut Pro and click File > Import > Files to import the converted videos to FCP for further editing.

Tuesday, May 17, 2016

Freely Copy Netflix DVD on Mac

The guide will offer you the easiest way to rip and copy Netflix DVD movies on Mac so that you can watch Netflix DVD movies anytime you like.

"Is there any way that can help me copy the Netflix DVD Rentals on El Capitan so that I can watch the movie without time limitation? Thanks for any tip"

Got some DVD discs from Netflix and want to copy them to your Mac? Look no further! Just follow this article to backup Netflix DVD on Mac with ease.

To get the work done, you need to get some help from third-party software. The best program I can recommend for handling Netflix DVD discs is Brorsoft DVD Ripper for Mac. This one-of-a-kind software tool lets you back up your Netflix DVD to your hard drive as DVD folder/ISO image files, bypassing DVD copy protection, or back up your DVD to DVD disc with 1:1 quality. Moreover, it offers a lot of common video formats for DVD Ripping like MOV, MKV, MP4, AVI, M4V and more. In addition, it is pre-set with some professional outputs for portable device such as iPhone, iPad, iPod, Galaxy Tab, PS3, Kindle Fire HD, Nook HD and so on. If you are a PC user, pls turn to Brorsoft DVD Ripper. Now just download the software, install it on your Mac and follow the steps below to start the joyful DVD copy journey.

How to Backup Netflix DVD on Mac

One: Import disc

Launch the program and insert the DVD disc that contains the DVD movies you want. Click the disc button to load DVD movies you want to convert. Note that you can also import DVD Folders, ISO files and IFO files.


Two: Choose output

Option A – Click "Format" bar to get the format list and select a proper export format. As you can see, various regular video formats like MP4, MOV, MKV, FLV, WMV, AVI, etc. are available in the "Common Video" profile.


Option B – If you just want to copy DVD to DVD folder with original structures, please go to Backup DVD with Original Structure.

Option C – If you just want to copy main movie without extras, commentary etc. documents, please go to Copy Movie Only from DVD discs.


Three: Set parameters

Before the DVD conversion, here is a chance to customize your output file including choosing the movie chapters you desire to rip and adjusting the video&audio settings according to your need.

Four: Start conversion

Click "Convert" button in the lower right corner and then a conversion progress bar would be popped up to let you check the ripping status.

When you the conversion process shows in 100%, you can locate the ripped video in target folder and enjoy the DVD movies as you like.

Read More:

Friday, May 13, 2016

Simply Add Blu-ray/DVD ISO files to iTunes library

iTunes does not support ISO files from as source media like Blu-ray, DVD. If you want to sync Blu-ray/DVD ISO to iTunes for playback, keep reading this post.


What does iTunes support

iTunes only supports MP4, MOV and M4V format.

How to sync Blu-ray/DVD ISO files to iTunes library

If you attempt to import ISO to iTunes, and possibly sync them to your iDevices later, you will need to convert ISO to iTunes compatible format first. In this article, you are going to learn how to convert ISO to iTunes friendly format with an easy-to-use yet powerful ISO to iTunes converter.

Here Brorsoft Blu-ray Ripper can fulfill your needs and provides perfect solutions for all the Mac users. Overall, it is a professional Blu-ray handling tool which convert ISO image to iTunes playable files with fast speed and high quality. Apart from BD/DVD ISO, you can also use it to convert Blu-ray, DVD to iTunes video and other regular video and audio formats like MP4, M4V, MOV, AVI, WMV, FLV, MKV etc.

What's more, if you want to play ISO video on your iPad, iPhone, iPod, you can directly select the device preset as the output format. Here is Mac version. Just download it and follow the guide how to convert ISO to iTunes compatible MP4 video.

How to stream Blu-ray/DVD ISO files to iTunes

Step One: After downloading, install and run Blu-ray ISO converter. Then click the "Load Blu-ray" button to add the source ISO files to the program.


Step Two: Select and custom output format. Click "Common Video" > "Common Video - H.264 Video(*.mp4)" to get the optimized output file for ISO to iTunes conversion.


Tip: If you like, you can click "Settings" to change the video encoder, resolution, frame rate, etc. Remember bitrate higher results in big file size, and lower visible quality loss. If you want to keep 1080p Full HD resolution, set the video size as 1080*1920.

Step Three: When everything is OK, press the big "Convert" button to start ISO to iTunes MP4 conversion.

After the conversion, get the output files by clicking the Open button and you are ready to import them into iTunes and if necessary, sync with your Apple device without hassle.

Read More:

Tuesday, May 10, 2016

Rip Blu-ray ISO to MP4 without quality loss

This article shows you how to easily convert Blu-ray ISO image files to MP4 video files without quality loss.


 "Hi, what's the best way to convert from a Blu-Ray ISO to MKV or MP4? I'm actually using Windows 7, but was hoping someone from this forum could help. Thanks."

Though Blu-ray ISO Image provides high-quality video effect, it is still protected and fails to be played on most players and devices. In order to play and share Blu-ray ISO files more conveniently, you'd better convert Blu-ray ISO to into MP4 or video format.

To achieve the goal, you can use Brorsoft Blu-ray Ripper. It is a professional ISO Converter program which can help you effortlessly rip Blu-ray to MP4, MKV, MOV, AVI, H.264, DivX, Xvid and more videos from Blu-ray ISO image files. Besides Blu-ray ISO files, it also can help you encode DVD movies, DVD/BD folders and IFO files. The equivalent Mac Blu-ray ISO converter is Brorsoft Blu-ray Ripper for Mac. Just get the right version of the Blu-ray Ripper and follow the guide below to convert ISO image files to MP4 videos for better playing and sharing in only three steps.

Guid on Convert Blu-ray ISO to MP4 in a few clicks

Step One: After downloading, install and run Blu-ray ISO converter. Then click the "Load Blu-ray" button to add the source ISO files to the program.


Step Two: Click Format bar to get the format list and select a proper export format. As you can see, various regular video formats like MP4, MOV, MKV, FLV, WMV, AVI, etc. are available in the Common Video profile.


Step Three: Tap the "Convert" button to begin the Blu-ray ISO to MP4/AVI/FLV/MOV/WMV, etc conversion.

After conversion, click Open button to get the output video clips and play, edit, share them anywhere you like.

Friday, May 6, 2016

2016 Best DVD Ripper for Mac Review

Do you want to get 2016 best DVD ripper for Mac? This article lists 2016 DVD Ripper for Mac reviews so that you can easily decide which one is the best DVD ripper for Mac for you.

 Say you have a movie on DVD, but you want to watch it on your phone, tablet, somewhere else. You can "rip" that DVD—or turn it into a movie file on your computer—to play it wherever you want. Here comes the key question-what is the best DVD Ripper for Mac. Thankfully, there are plenty of great utilities designed to make the process easy and give you files that are playable on any device you choose, whenever you choose to watch them. Here are Three of the best. Keep reading.

1. Brorsoft DVD Ripper for Mac

You can easily rip DVDs, or extract/get files off your DVD disc to your hard drive for backing up or playing. It also has the ability to convert the DVDs to many other formats.

Features:

Support source DVD disc, DVD VIDEO_TS folder, and DVD IFO/ISO
Rip DVD to AVI, MKV, WMV, MOV, M4A, WMA and other video/audio formats
Be compatible with QuickTime Movie format
Edit source DVD with built-in video editor

Ripping Process-Simple with several clicks

1. Load DVD movie into App
2.  Choose output format
3. Start Ripping


Pros:
Nice interface
Fast and Easy to use
Stable ripping process
Support almost all commercial discs
Multiply output formats

Cons:
Not free

2. MakeMKV

It can quickly and easily rip DVD discs to high quality MKV files with a single click. The app preserves all of the source disc’s information, including tracks, chapters, HD audio, menus, and so on.

Pros:
Entirely free to download and use
Provided with a simple and intuitive interface

Cons:
No compression of output file
Limitation of output formats

3. Handbrake

Handbrake is our favorite video encoder for a reason: it’s simple, easy to use, easy to install, and offers a wealth of tweaking options to get the best possible file as a result.

Pros:
Great design and stability
Easy to use
Completely free

Cons:
Can't deal with encrypted DVD discs
Live preview only supports the first four minutes of video
Intimidating interface.

Tuesday, May 3, 2016

Ripping Blu-ray Discs with Forced Subtitles

Here is a Blu ray ripping guide intends to show you how to convert Blu-ray movies with forced subtitles for better enjoyment.


 What is the forced subtitle?

Forced subtitles are common on movies and only provide subtitles when the characters speak a foreign or alien language, or a sign, flag, or other text in a scene is not translated in the localization and dubbing process. On Blu-ray, each subtitle item has an attribute that specified whether particular subtitle appearance should be forced. Forced subtitles are shown when movie contains a foreign language scene.

Why do you backup Blu-ray Movies with Forced Subtitles?

If you've collected a pile of Blu-rays, you will find a way to get a movie onto your hard drive, and then you can do all kinds of other cool stuff with it: Transcode it into a different format so that it'll play on your tablet, smartphone or gaming console easily. When you get some Blu-ray movies with foreign languages(like Star Wars, Avatar), you probably will struggle finding an acceptable way of capturing forced subtitles on Blu-ray rips for better enjoyment.

How to obtain forced subtitle from Blu-ray movie?

Brorsoft Blu-ray Ripper is highly recommended here. It can allow users to create videos with forced subtitles when ripping Blu-ray to MKV, AVI, MP4, MOV, M4V, WMV, etc, as you like. What's more, it supports a variety of multimedia devices including PS Vita, Apple TV, Kindle Fire HD, Nexus 10, Nook HD, Asus Transformer Pad Infinity TF700, Microsoft Surface tablet and more. If you are running on Mac, please turn to Brorsoft Blu-ray Ripper for Mac. Now download it and start the Blu-ray conversion with forced subtitles.

One: Insert your disc to your Blu-ray drive, and launch the Blu-ray Ripper; click the disc button to import your Blu-ray movies to the program. This professional tool also can support DVD discs and DVD/BD folders.


Two: After choosing the main subtitle you want in "Subtitles" column, check "forced subtitles" before converting. When "forced subtitles" is checked, the subtitles appear on the screen only when foreign languages (i.e. Francais) other than English are spoken.


Three: Tap Format bar and choose your desired format. As you see, regular video formats like AVI, MP4, WMV, FLV, MKV, MOV, etc. are provided. Besides, you can also find lots of optimized profiles for many popular portable media devices including Android devices like Nexus 7, Galaxy Tab, HTC, iDevices Apple TV, iPad and more.


Four: After all the settings, press the right-bottom "Convert" button to start to convert Blu-ray movies with forced subtitles.